Eggless No Bake Mango Cheesecake

No Bake Mango Cheesecake 1

Back to blogging after a long break… Hubby’s parents and sister n family were with us for 2 months vacation. Was really engrossed with the cooking, outings , shoppings 😉 Kids were all excited to have cousins over ..

collge

One day my father in law showed me an article that came in the newspaper . The author was mentioning how hectic it was with her family visiting them for vacation and how she will miss them when they go back , but at the same time she was longing to get back to her usual routine and writing . My father in law was pulling my leg asking if that was how I too feel , the only difference would be that I am not into writing 😉 I replied laughing , I will get back to my blog later.. 🙂  But now house does feel a little empty without them here…

collge2

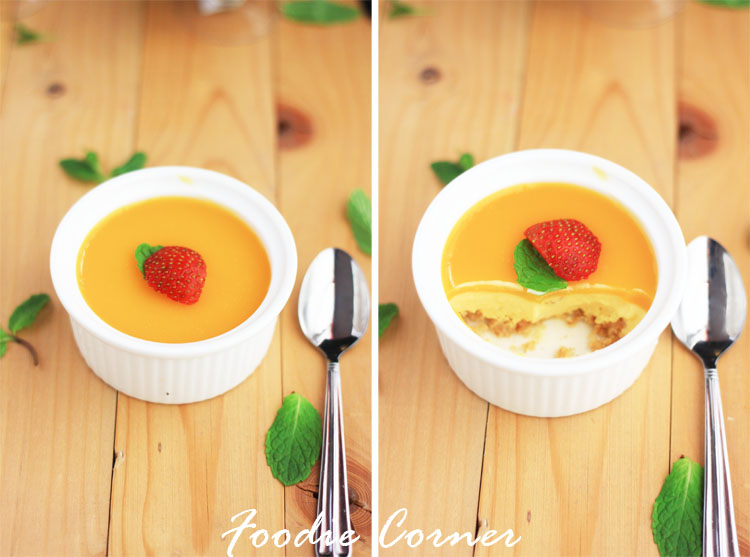
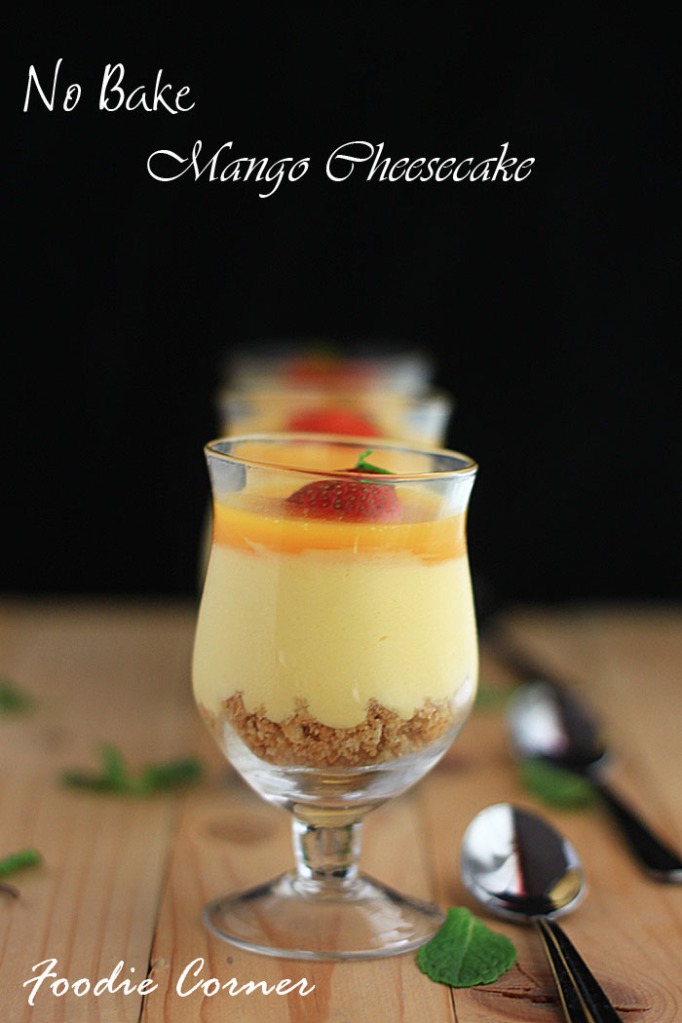
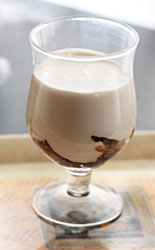
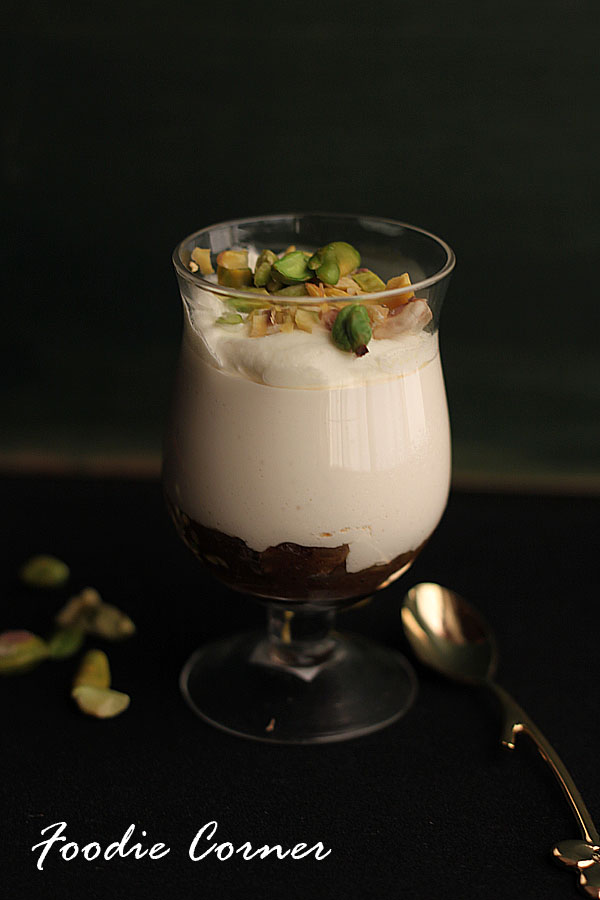
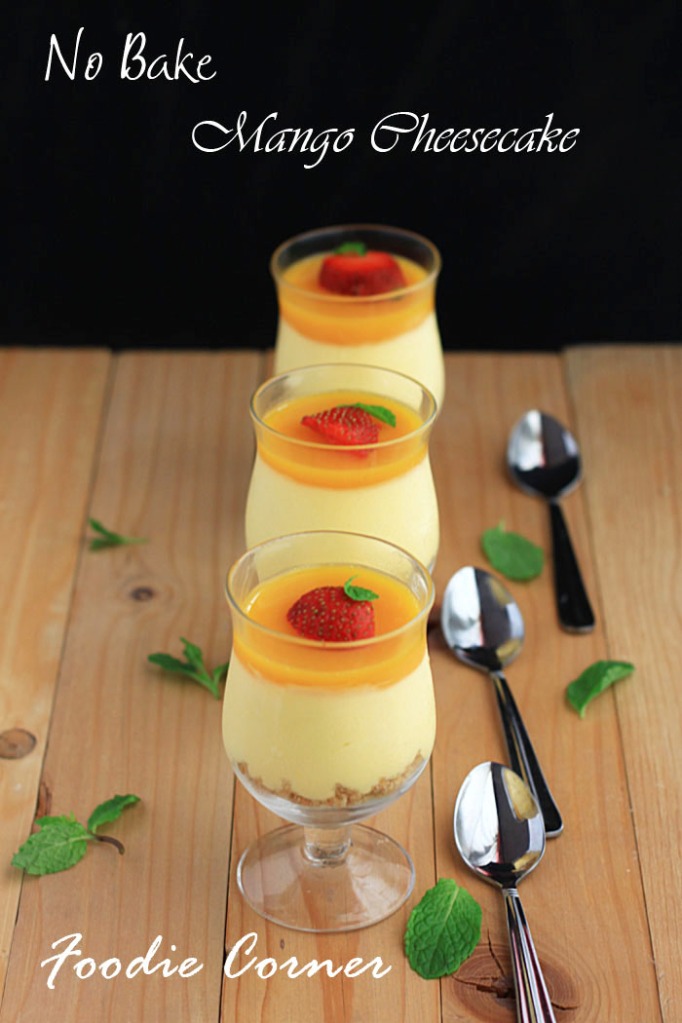
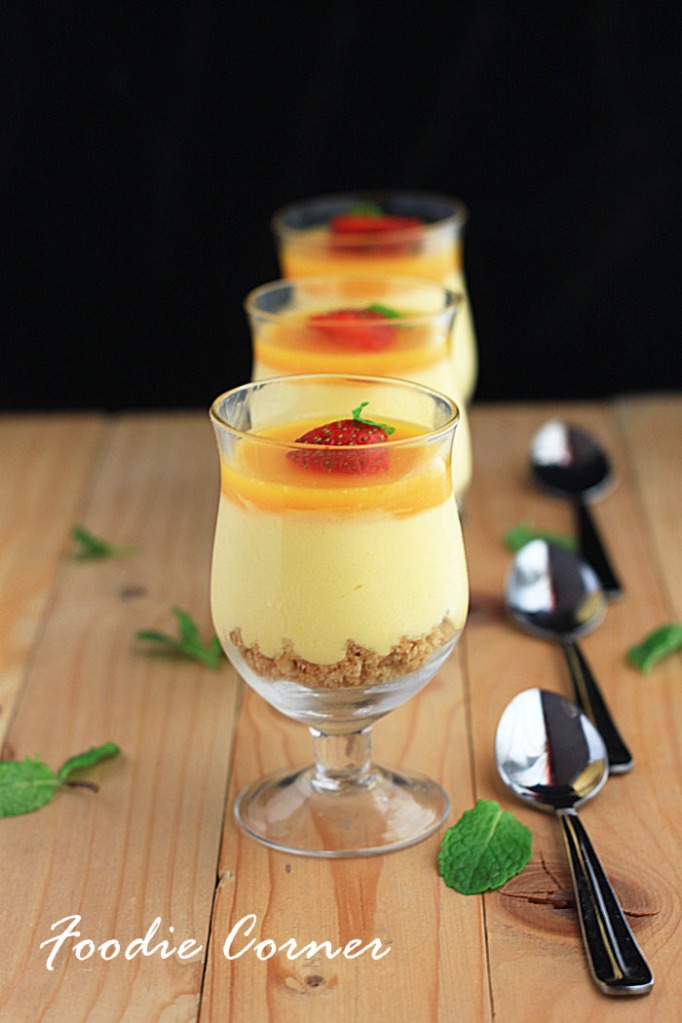
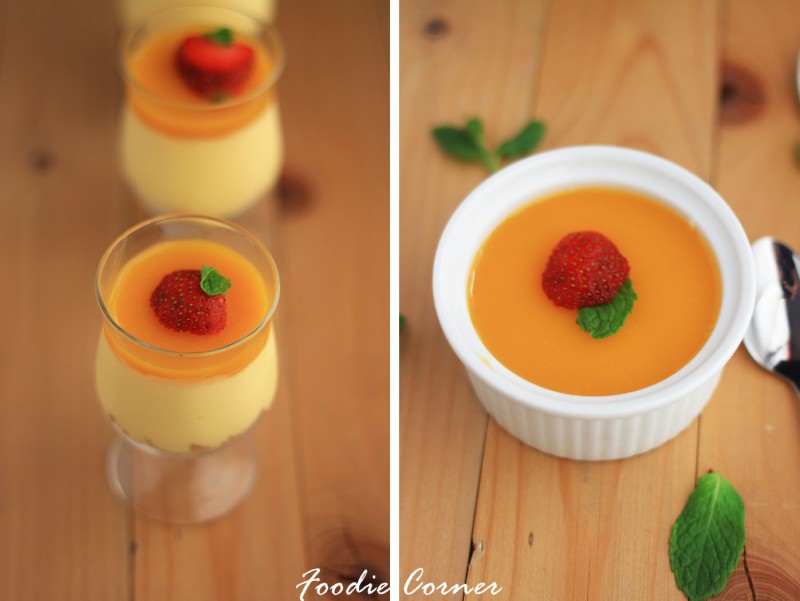
After the No Bake Dates Cheesecake here is yet another no bake cheesecake for you. Since it is mango season what better option other than mangoes?  And this recipe is for all my friends who have been asking for easy , not complicated recipes.. 🙂  This recipe takes only about 15 minutes to prepare.. (apart from the freezing time) And you have a rich delicious cheesecake that will make others go for a second serving .. . I had made this no bake mango cheesecake when in laws were here.. And it was well appreciated. Preparing the cheesecake in individual glasses is a great idea as they give a visual appeal too.. or you could use a loose bottomed spring form pan.

No Bake Mango Cheesecake IMG_5456

I found this recipe from the beautiful blog Maria’s Menu. I have been following her blog for a long time now, even before my blogging days. Do try out this recipe. ..

No Bake Mango Cheesecake mix

EGGLESS NO BAKE MANGO CHEESECAKE

EGGLESS NO BAKE MANGO CHEESECAKE

  • Servings: 12
  • Difficulty: Easy
  • Print

INGREDIENTS

FOR THE BISCUIT LAYER

  • Digestive biscuits – 250 gms, finely crumbled
  • Unsalted Butter – 100 gms, melted

FOR THE CHEESECAKE LAYER

  • Philadelphia full fat cream cheese – 340 gms/ 12 oz (or any other cream cheese available)
  • Whipping cream – 250 ml (1 cup approx)
  • Mango pulp – 1½ cup
  • Mango – 1-2, cut into small bite size pieces (optional)
  • Gelatin – 1 tbsp/10 gms
  • Hot water – ½ cup
  • Icing sugar – 2-3 tbsp
  • Sugar – ⅓ cup

FOR THE GLAZE TOPPING

  • Mango pulp – 1 cup
  • Gelatin – 1 tbsp/10 gms
  • Hot water – ½ cup

METHOD

FOR THE BISCUIT LAYER

  1. Combine the finely crumbled biscuits and melted butter. Press this mixture to a loose bottom tin or the dish you are using. Refrigerate it while you make the rest of the cheesecake.

FOR THE CHEESECAKE LAYER

  1. Dissolve gelatin in hot water.
  2. Whip the whipping cream with 2-3 tbsp icing sugar, till soft-medium peaks form.
  3. Combine the cream cheese and sugar, till it becomes smooth.
  4. Combine the mango puree and warm gelatin mixture. Add this to the cream cheese mixture. Mix well.
  5. Add the whipping cream to this in two batches and combine well.
  6. Add the mango pieces (if using) and mix well.
  7. Pour this mixture over the biscuit base and return it to the fridge.
  8. Make sure that this layer is refrigerated for a minimum of 2 hours, before adding the glaze topping

FOR THE GLAZE TOPPING

  1. Dissolve the gelatin in hot water. When it is warm, add it to mango puree and mix well.
  2. Pour this over the cream layer, once it is set. Refrigerate for another 2 hours or till you serve. Garnish with strawberry/ mint leaves.
  3. Keep at room temp 10 mins before serving, so that the biscuit layer softens a bit.


No Bake Mango Cheesecake IMG_5492

No Bake Dates Cheesecake – for 3 years of blogging and 100,000 hits

Dates Cheesecake

3 years of blogging !!!  I had started this blog  on a whim . A gentle prodding from a couple of friends and relatives .. and I entered into the world of blogging.. It definitely helped me learn new things – be it decorating cakes, baking breads or food photography.  And it has helped me connect with people who share a passion for food .

IMG_7726

There were times when I was not happy with my photography and kept away from posting because of the poor quality of the snaps.  Submitting photos to the food sites, foodgawker and tastespotting , and the photos getting rejected many a time. During those times, my friends and family would keep pushing me. Thanks to all you wonderful people who kept inspiring and encouraging me

IMG_7866_blog

We’ve got one more reason to celebrate – the blog has crossed 1 lakh hits  !! Definintely something sweet , for this double celebration !!   I got this recipe from hubby’s aunt  (Elemma) who is a superb cook. I have been making this dates cheesecake for the last 10 years and it has never failed to get the wow feedback .And it is a fairly easy recipe too .
IMG_7727

It is better to prepare this  about a day in advance so that the flavour of dates is well absorbed by the cheesecake layer . Here is the step by step procedure. You can find the full recipe at the end of the post.

IMG_7766

Heat a pan. Add 2 tbsp of butter . When it melts add 6 tbsp of sugar. Let the sugar caramalise on medium flame. step1

Add the chopped dates to the caramalised sugar . Stir and mix in the dates. Add abt 1/4 cup of water and continue to mix till the water evaporates and you get a soft paste of dates. Spoon the dates paste to the pudding dish or individual glasses

step2

To make the cheesecake layer – Mix 200ml fresh cream and 2 tins of Nestle cream and 2 tbsp sugar .Soak 1 tbsp of gelatin in 5 tbsp of cold water for about 10 minutes. Double boil the gelatin till it is completely dissolved. Add the gelatin to the cream mixture. Add 1 tsp vanilla essence.

step3

Pour the cream over the dates layer and refrigerate it for 3-4 hours.step4

Beat 1 sachet of dreamwhip powder with 1/2 cup of milk and few drops of vanilla essence using an egg beater for 5-8 minutes. Pour the whipping cream over the cheesecake layer.

IMG_7740

NO BAKE DATES CHEESECAKE

Recipe Source – Elemma

NO BAKE DATES CHEESECAKE

  • Servings: 12
  • Difficulty: Easy
  • Print

INGREDIENTS

FOR THE DATES LAYER

  • Dates, deseeded and chopped – 400 gm
  • Butter – 2tbsp
  • Sugar – 6 tbsp
  • Water – 1/4 cup

FOR THE CHEESECAKE  LAYER

  • Fresh cream – 200 ml
  • Nestle cream – 2 tins
  • Gelatin – 1 tbsp
  • Sugar – 2 tbsp
  • Vanilla essence – 1 tsp

FOR THE WHIPPED CREAM LAYER

  • Dreamwhip  – 1 sachet
  • Milk – 1/2 cup
  • Vanilla essence – 1 tsp

METHOD

FOR THE DATES LAYER

  1. Heat a pan. Add 2 tbsp of butter .
  2. When it melts add 6 tbsp of sugar. Let the sugar caramalise on medium flame.
  3. Add the chopped dates to the caramalised sugar . Stir and mix in the dates.
  4.  Add about 1/4 cup of water and continue to mix till the water evaporates and you get a soft paste of dates.
  5. Spoon the dates paste to the pudding dish or individual glasses

FOR THE CHEESECAKE LAYER

  1. Mix 200ml fresh cream and 2 tins of Nestle cream and 2 tbsp sugar .
  2. Soak 1 tbsp of gelatin in 5 tbsp of cold water for about 10 minutes.
  3. Double boil the gelatin till it is completely dissolved.
  4. Add the gelatin to the cream mixture. Add 1 tsp vanilla essence.
  5. Pour the cream over the dates layer and refrigerate it for 3-4 hours.

FOR THE WHIPPED CREAM LAYER

  1. Beat 1 sachet of dreamwhip powder with 1/2 cup of milk and few drops of vanilla essence using an egg beater for 5-8 minutes.
  2. Pour the whipping cream over the cheesecake layer and refrigerate for 2 hours

Note:  The cheesecake tastes best the next day, as it gives enough time for the dates flavour to be well absorbed by the cheesecake layer.

IMG_7817

No Bake Strawberry Ripple Cheesecake

IMG_3438 copy

My first cheesecake post !!  I have tried a few no bake cheesecakes in the past, but they were all too ‘cheesy’ for me..  after the few failed attempts I had not ventured in to cheesecakes for sometime..

IMG_3351_1

Recently as I was skipping through one of the new cookbooks I bought, came across this cheesecake recipe.. Actually it was the snap that caught my attention, all pink and heart shaped !! And  the recipe didn’t have loads of cheese . One of my favourite puddings is the one with yogurt and cream. This cheesecake recipe had both these along with the cheese.. So this was something that would be suitable for my taste palettes !!

IMG_3500

The original recipe calls for raspberry.. but as strawberries are in season, I thought of trying those.. And while browsing through the foodgawker site, came across this beautiful heart shaped swirl patterns at Tracy’s culinary adventures ..  I love these swirls, don’t you??

IMG_3472

collge2

NO BAKE STRAWBERRY RIPPLE CHEESECAKE

[ RECIPE SOURCE – ADAPTED FROM COMPLETE BOOK OF DESSERTS, GOOD HOUSEKEEPING ]

INGREDIENTS

FOR THE BASE

  • Chocolate bisuit crushed – 225gm ( I used Good day biscuits)
  • Butter (at room temperature) – 100 gm

FOR THE FILLING

  • Strawberry puree (sieved) – 1/2 cup + 3 tbsp for the swirl design
  • Yogurt – 300 ml
  • Low fat soft cheese – 150gm (I used Puck cream cheese)
  • Gelatine – 1 tbsp
  • Whipping cream – 2 cups
  • Icing sugar – 100gm
  • Mint leaves – to decorate

IMG_3473 copy

METHOD

Grease a spring release cake tin

For the base

  1. Mix the crushed biscuits and butter .
  2. Spoon the mixture into the base of the cake tin .
  3. Chill while making the filling

For the filling

  1. Mix the yogurt, cheese and strawberry puree in a blender.
  2. Sprinkle the gelatine over 2 tbsp pf water in a small bowl and leave to soak for 2-3 minutes.  Place the bowl over a pan of simmering water and stir until dissolved.Leave to cool for 2 minutes and add to the cheese mixture .
  3. Fold the whipping cream into the cheese mixture with a spoon.
  4. Pour the cheese mixture over the biscuit base.

For the swirl pattern

Spoon in the puree into a piping or sandwich bag with a small hole at the tip . Pipe in small circles on the cheesecake in a swirl pattern.  Run a toothpick , beginning from the outer circle through each dot all the way to the center , without lifting the toothpick . Or you can just put in random dots all over and swirl them with the toothpick.

Refrigerate the cheesecake for 5-6 hours… Decorate with mint leaves and serve .

IMG_3500_b copy

IMG_3472_500